We’ll see you in there.
Connect to customize your food & drink discovery.
By signing up you agree to our Terms of Service and Privacy Policy.
Halloween Sugar Cookies
30 mins Prep Time
12 mins Cook Time

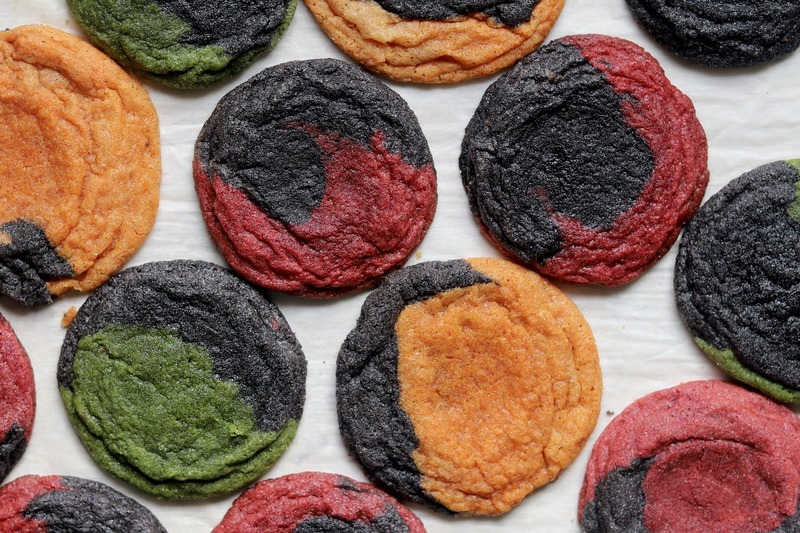
Constellation Inspiration made matcha Neapolitan sugar cookies very popular on the internet. Using her recipe as the base, I decided the possibilities are endless. Of course, in honour of Halloween, I made some very Halloween tweaks! First and foremost, I wanted bright and bold Halloween colours with flavours to match. I settled on bright, citrusy orange for the orange colour, luxurious red velvet for red and deeply flavourful matcha for green. For black, I used black cocoa, which, contrary to what people may think; deeper colour equals a more intense chocolate flavour; the chocolate flavour in black cocoa is not so intense. Black cocoa adds colour but also subtly adds chocolate notes to the sugar cookie. Of course, to enhance the colours even more, I used food colouring gel to get those Halloween colours popping and eye-catching. I doubled the original recipe and ever so slightly changed some measurements and the ad-ins. These cookies are crunchy on the outside, soft and ever so slightly chewy in the centre. They are quite addicting and the flavour combos are endless. Check this recipe out if you are looking for a fun cookie project.
Directions
Halloween Sugar Cookies
17 Steps
Step 1
Preheat your oven to 350°F and prep a couple of baking sheets lined with parchment paper.
Step 2
Using a stand mixer, cream your butter and sugar together for about 1 minute. Add your eggs one at a time and your vanilla. Mix until combined. This can take anywhere from 30 seconds to 1.5 minutes. Scrape bottom of bowl if needed to make sure everything is mixed together.
Step 3
In a bowl, mix together your dry ingredients, flour, baking powder, baking soda and salt.
Step 4
Add flour mixture to butter mixture and mix until just combined. About 30 seconds.
Step 5
Divide the dough into two equal portions. Divide one of the two portions into 3.
Step 6
Half the dough should go into a big bowl. The other half of the dough that was divided into thirds should go in three separate bowls.
Step 7
Black Cookie Dough: Add 3 tablespoons of black cocoa to the biggest portions of the dough. Using a tooth pick add black food colour gel to the cookie dough and using a metal or wooden spoon, mix properly until dough is evenly black. Add more food colouring depending on colour you want to achieve. The food colouring is only necessary if you want a deeper black colour. Black cocoa powder is naturally dark and will colour your dough.
Step 8
Green Cookie Dough: In one of the other three smaller bowls, add matcha powder and green food colour gel and mix (adjust amount of gel if you please). I tend to use a little less matcha, closer to 1 1/2 tablespoons because matcha can be a bit bitter. The food colouring is only necessary if you want a deeper green colour. Matcha powder is naturally green and will colour your dough.
Step 9
Red Cookie Dough: In the second of the three smaller bowls, add 1 tablespoon of dutch processed cocoa, red food colour gel and mix (adjust amount of gel if you please, to get a deeper red).
Step 10
Orange Cookie Dough: In the third of the three smaller bowls, add 1 tablespoon of flour, the zest of half an orange, orange food colour gel, and mix (adjust amount of gel if you please, to get a deeper orange). I find it hard to find orange food colouring so I just mix red and yellow most times. Note: to make orange you need more yellow than red food colouring gel.
Step 11
Combinations are up to you but since this recipe makes more black cookie dough, I tend to pair black with the other three colours. Black-red, black-green and black-orange. Remember this recipe makes 22-24 cookies.
Step 12
Take a tablespoon of each dough and combine the dough by rolling between the palms of your hands.
Step 13
In a small bowl, add extra granulated sugar and toss each ball of cookie dough in it.
Step 14
Bake cookie dough balls on your baking sheets, spaced out so they do not touch each other after spreading in oven (about 2 inches).
Step 15
Bake until edges are slightly browning. They may not look brown at all if your colours are bold but just trust the bake time and intuition. I usually know they are ready to come out because they puff up and are just the slightest bit glossy in the centre. Note: the centre will be soft when you take them out but they should set once cool. My cookies are usually great after 13.5 minutes.
Step 16
When you take them out, allow to cool on a baking sheet and transfer to a wire rack.
Step 17
They freeze well or store in an airtight container and eat within 3 days for optimal freshness.
Recommended For You